PC-Engines APU.2D4 as Docker Worker
Views: 7165
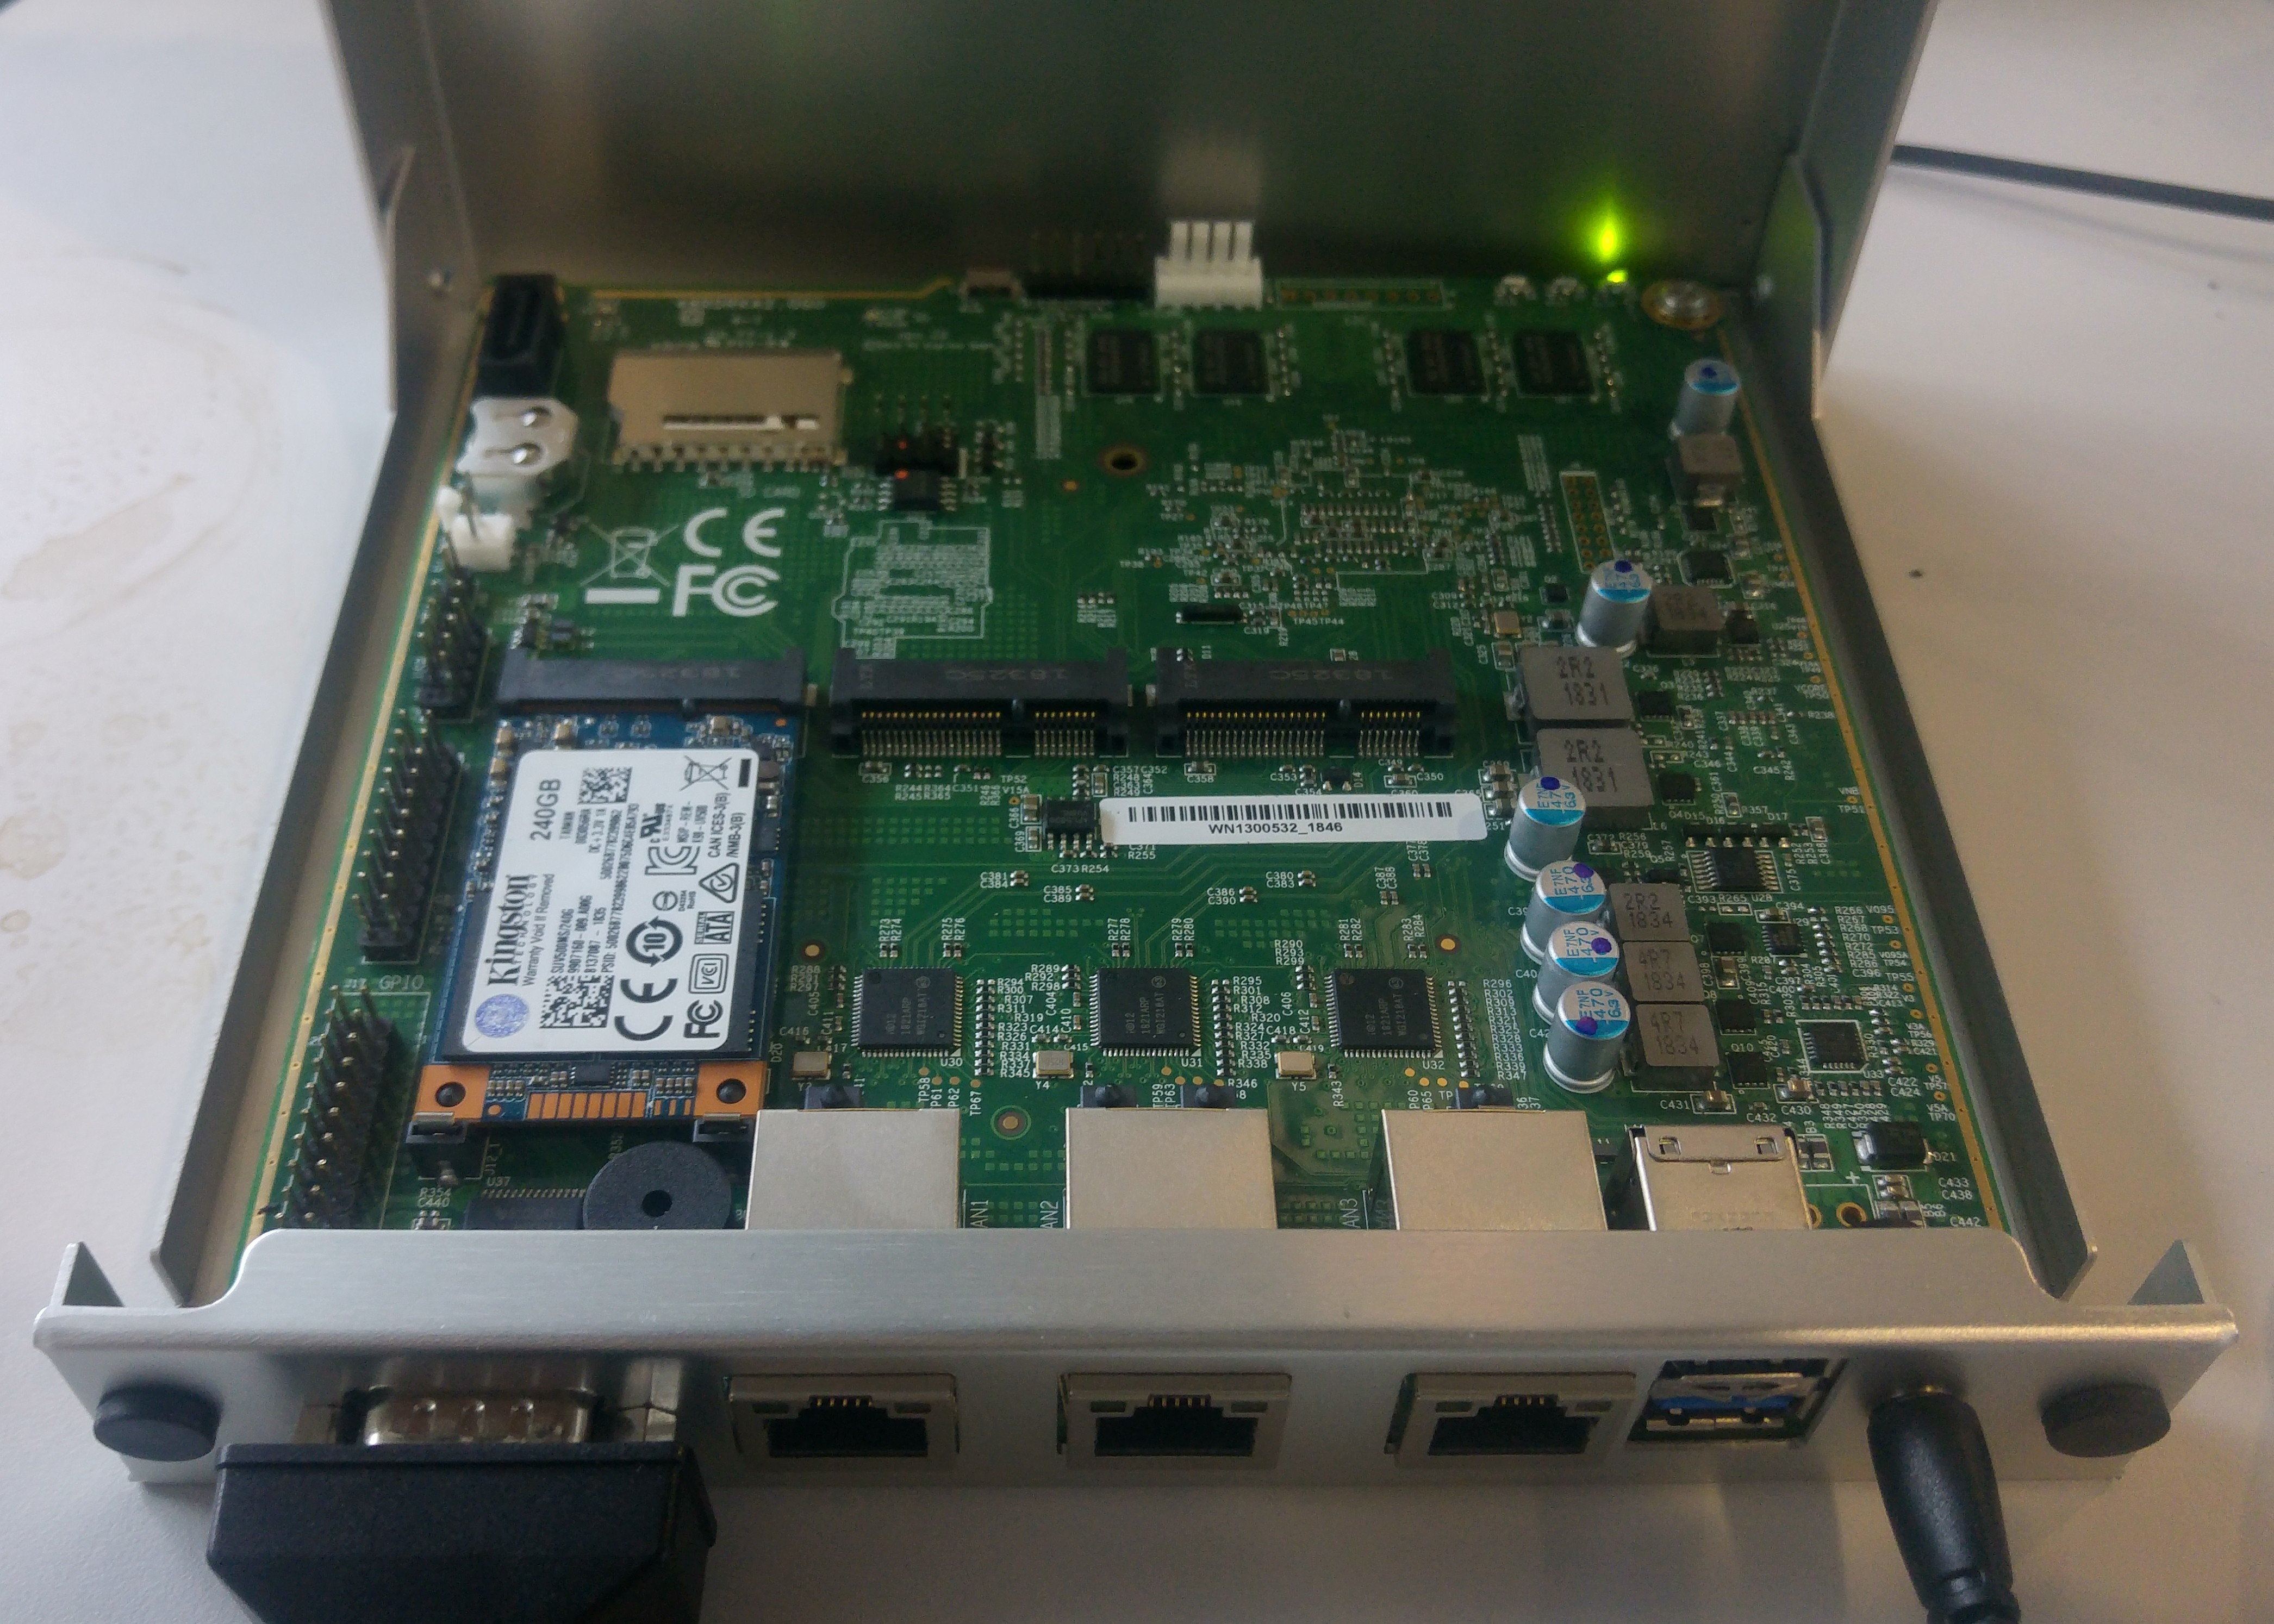 In my docker swarm, I currently use two old notebooks as docker swarm manager and worker. I was looking around for some cheap and power saving servers that have at least a quad-core CPU and 4GB RAM, when a friend pushed me towards https://pcengines.ch. Here the APU2-Plattform comes with 2 or 4GB RAM, where APU.2D4 meets my specifications best.
Costs
So I bought one for testing the performance in a docker swarm. Basic board costs (excl. VAT) CHF 118,60 + case CHF 8,65 + power adapter CHF 3,90, that’s CHF 141,25 including VAT (7,7%). The largest mSATA SSDs offered in this shop are a bit too small for docker volumes and containers, it should be at least 100GB, better 200GB, so I ordered a Kingston UV500 (240GB, mSATA) in Digitec at CHF 59,60. Update: Only 8GB are used after a Week, so 60GB are enough. That’s all in all costs of CHF 200,85 per server (CHF 178 with 60GB when ordering 5). In addition, I needed a USB to serial adapter cable, which is sold at PC-Engines for CHF 7,20 + VAT.
Assembly and Installation
The hardware assembly is simple, except mounting the heat spreader is a hassle. I had to mount the mSATA harddisk into the first adapter, next to the border of the board, before it was not detected at boot. Anyway, I have sometimes trouble, that USB or mSATA are not detected at boot, they should be listed when I press F10 at start. In this case, I just restart by removing and reattaching the power source.
Attach the USB-serial adapter cable to the APU.2D4 on one side and to the Ubuntu Laptop on the other side. On Ubuntu, I use minicom for the connection:
- detect USB-serial adapter port, after plugin hit
dmesg | grep tty:
[1790314.766223] usb 1-1: cp210x converter now attached to ttyUSB0 - configure
minicomwithsudo minicom -s:- In serial settings set device to e.g.
/dev/ttyUSB0 - Check that Bps is set to:
115200 8N1 - save and exit
- In serial settings set device to e.g.
- run
sudo minicomand you are ready to boot your server, or better:- add user to serial-group, run
sudo adduser $(whoami) dialout - then logout, login or call
ssh localhost - run
minicomas non-rootuser
- add user to serial-group, run
- plugin power on the server
Now you see the APU.2D4’s boot messages. You may hit F10 to check the boot configuration, but by default it should already boot from the USB stick.
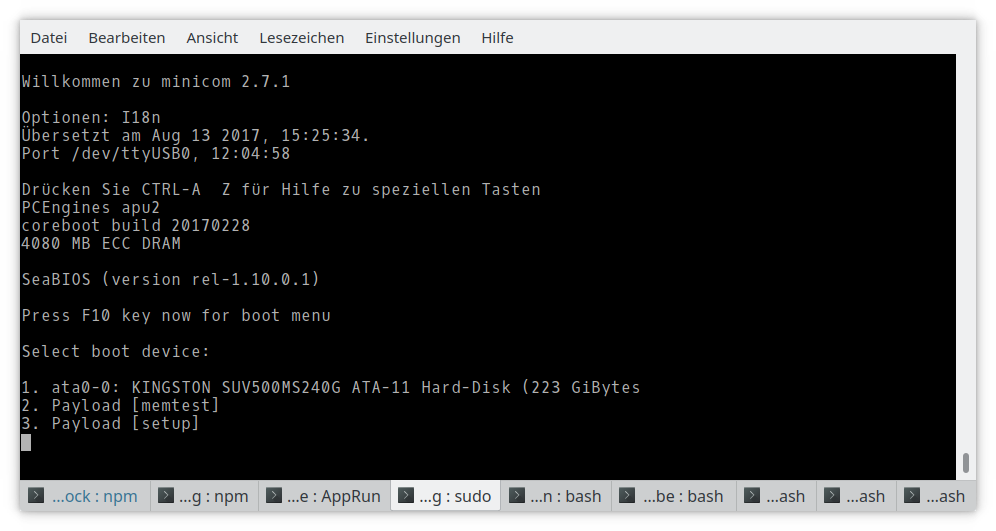
Install Ubuntu Server 18.04 from Alternate Installer
As operating system, I installed Ubuntu Server 18.04.1. Note: The alternate installer is required to be able to boot through a serial device. Use USB-Disk-Creator (package usb-creator-gtk) to copy the ISO-image to a USB stick. Attach the USB boot disk to one of the two USB connectors.
Insert the USB stick, at prompt, hit F10. If the USB stick is not in the menu, unplug and replug the power and retry. I had one server, where the USB did not appear even after several reboots. Finally I started, chose 2. Payload [setup]. In that menu I unplugged and replugged the USB stick, then exited with saving and every second time, the USB stick appeared.
At boot: prompt enter: install vga=off console=ttyS0,115200n8
What follows is a standard Ubuntu console installation. For me, it works out of the box. I even configured the mSATA hard disk with LVM and encryption. After installation and reboot, I am able to type the LUKS disk password through the serial adapter. I only install OpenSSH for remote access as service. The first network adapter is the jack to the left.
After Installation
After Ubuntu installation, do some fixes, cleanup and installations. Here is the summary to copy paste. Details are explained below:
sudo rm /etc/resolv.conf sudo ln -s ../run/systemd/resolve/resolv.conf /etc/resolv.conf sudo apt-get autoremove --purge mlocate snapd wget -qO- https://download.docker.com/linux/ubuntu/gpg | sudo apt-key add -sudo add-apt-repository"deb [arch=amd64] https://download.docker.com/linux/ubuntu $(lsb_release -cs) stable" apt-get dist-upgrade sudo apt-get install docker-celizardfs-clientlm-sensorssudo adduser $(whoami) dockersudo mkdir -p /srv/volumes / sudo tee -a /etc/fstab <<EOFmfsmount /srv/volumes fuse rw,mfsmaster=universum,mfssubfolder=/volumes,mfsdelayedinit,nosuid,nodev,noatime,big_writes,mfschunkserverwriteto=40000,mfsioretries=120,mfschunkserverconnectreadto=20000,mfschunkserverwavereadto=5000,mfschunkservertotalreadto=20000 0 0 EOF sudo mount /srv/volumessudo sensors-detect
sudo patch -l -d/ -p0 <<EOF
--- /etc/apt/apt.conf.d/50unattended-upgrades    2018-07-18 13:22:36.000000000 +0200
+++ /etc/apt/apt.conf.d/50unattended-upgrades    2018-12-25 15:56:41.828577373 +0100
@@ -11,9 +11,10 @@
     // available, the policy for updates is such that unattended-upgrades
     // should also install from here by default.
     "\${distro_id}ESM:\${distro_codename}";
-//    "\${distro_id}:\${distro_codename}-updates";
+    "\${distro_id}:\${distro_codename}-updates";
 //    "\${distro_id}:\${distro_codename}-proposed";
 //    "\${distro_id}:\${distro_codename}-backports";
+    "Docker:\${distro_codename}";
 };

 // List of packages to not update (regexp are supported)
EOF
Danger: Don’t replace /etc/default/grub when you update Ubuntu!
Special Case: Install Network
When I set up my first box, I did not have network access, so I could not use the automatic configuration of the Ubuntu installer. That’s why I had to manually setup the networks. Unfortunately the etwork configuration changed from Ubuntu 16.04 to 18.04, so I explain here how it works now: Once more, boot into a shell through the serial console. I only use the leftmost cable, which is enp1s0.
You see all device names, when you execute: ls /sys/class/net.
Using sudo vi /etc/netplan/01-netcfg.yaml add ethernets, then call sudo netplan apply:
# This file describes the network interfaces available on your system
# For more information, see netplan(5).
network:
  version: 2
  renderer: networkd
  ethernets:
    enp1s0:
      dhcp4: true
Fix DNS
In Ubuntu 18.04, /etc/resolv.conf is defect, it does not used the DNS given by DHCP.
Fix it:
sudo rm /etc/resolv.conf
sudo ln -s ../run/systemd/resolve/resolv.conf /etc/resolv.conf
Cleanup Ubuntu
Ubuntu server installs some useless tools that use a lot of disk, memory or cpu, especially mlocate uses up to 25GB disk space. snapd is a useless package manager that uses quite an amount of RAM. So cleanup:
sudo apt-get autoremove --purge mlocate snapd
Update Ubuntu
apt-get update
apt-get upgrade
Danger: When you update Ubuntu, you will be asked, whether you want to use a new /etc/default/grub. Don’t! Keep your version, the other one is missing the last two lines:
GRUB_TERMINAL=serial
GRUB_SERIAL_COMMAND="serial --unit=0 --speed=115200 --word=8 --parity=no --stop=1"
Unattended Upgrades
I recommend to install unattended upgrades for Ubuntu. You can chose this option in the Ubuntu installer or you may install it later using: sudo apt-get install unattended-upgrades. In any case, I recommend to do all upgrades, not only security upgrades, as it is configured by default, so the allowed origins in /etc/apt/apt.conf.d/50unattended-upgrades should be:
Unattended-Upgrade::Allowed-Origins {
        "${distro_id}:${distro_codename}";
        "${distro_id}:${distro_codename}-security";
        // Extended Security Maintenance; doesn't necessarily exist for
        // every release and this system may not have it installed, but if
        // available, the policy for updates is such that unattended-upgrades
        // should also install from here by default.
        "${distro_id}ESM:${distro_codename}";
        "${distro_id}:${distro_codename}-updates";
//      "${distro_id}:${distro_codename}-proposed";
//      "${distro_id}:${distro_codename}-backports";
        "Docker:${distro_codename}";
};
You may apply the changes as patch:
sudo patch -l -d/ -p0 <<EOF
--- /etc/apt/apt.conf.d/50unattended-upgrades    2018-07-18 13:22:36.000000000 +0200
+++ /etc/apt/apt.conf.d/50unattended-upgrades    2018-12-25 15:56:41.828577373 +0100
@@ -11,9 +11,10 @@
     // available, the policy for updates is such that unattended-upgrades
     // should also install from here by default.
     "\${distro_id}ESM:\${distro_codename}";
-//    "\${distro_id}:\${distro_codename}-updates";
+    "\${distro_id}:\${distro_codename}-updates";
 //    "\${distro_id}:\${distro_codename}-proposed";
 //    "\${distro_id}:\${distro_codename}-backports";
+    "Docker:\${distro_codename}";
 };

 // List of packages to not update (regexp are supported)
EOF
Check CPU Heat
To be sure, that the cooling is attached correctly, I recommend to survey the CPU temperature:
- Install the sensors:
sudo apt-get install lm-sensors - Configure the sensors:
sudo sensors-detect(I saidYESonly where it is not risky) - Check the sensors:
sensors - Constantly check the temperature in a shell:
watch -n 10 sensors - Use
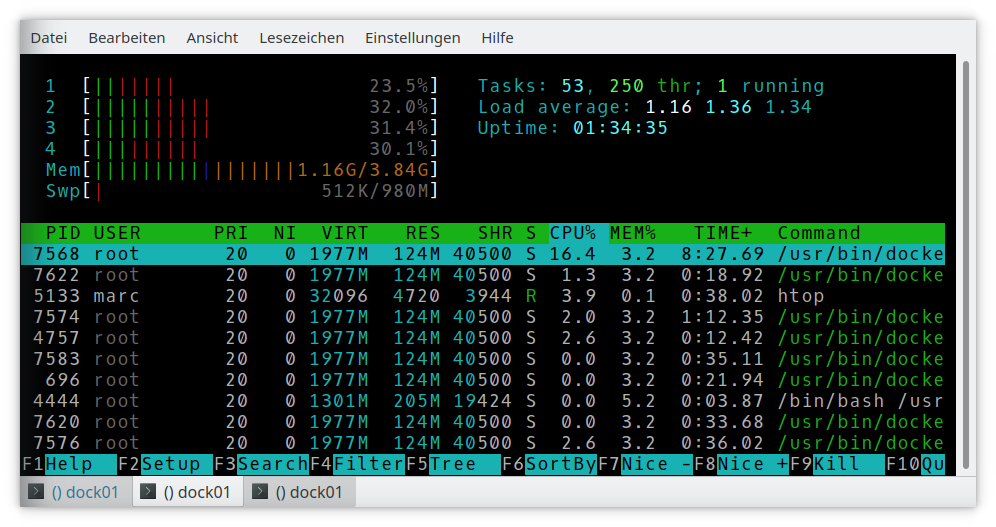
htopto watch system load, memory and cpu usage
Mount LizardFS Volumes
- Install LizardFS client:
sudo apt-get install lizardfs-client - Create mountpoint, e.g.:
sudo mkdir -p /srv/volumes - Add mount command to
/etc/fstab, e.g.:mfsmount /srv/volumes fuse rw,mfsmaster=universum,mfssubfolder=/volumes,mfsdelayedinit,nosuid,nodev,noatime,big_writes,mfschunkserverwriteto=40000,mfsioretries=120,mfschunkserverconnectreadto=20000,mfschunkserverwavereadto=5000,mfschunkservertotalreadto=20000 0 0
- Mount:
sudo mount /srv/volumes
Install Docker
wget -qO- https://download.docker.com/linux/ubuntu/gpg | sudo apt-key add -sudo add-apt-repository"deb [arch=amd64] https://download.docker.com/linux/ubuntu $(lsb_release -cs) stable" sudo apt-get update sudo apt-get install docker-ce sudo adduser $(whoami) docker
Log out, log in again, then join the swarm using docker swarm join --token ….
Performace
After migration of six services to the new APU.2D4 server, temperature is at 66,2°C, load average is less than 1,5, the four CPUs are at less than about 40% and memory is at 1,12GB. That seems quite acceptable. After one week, I am satisfied and order five more.
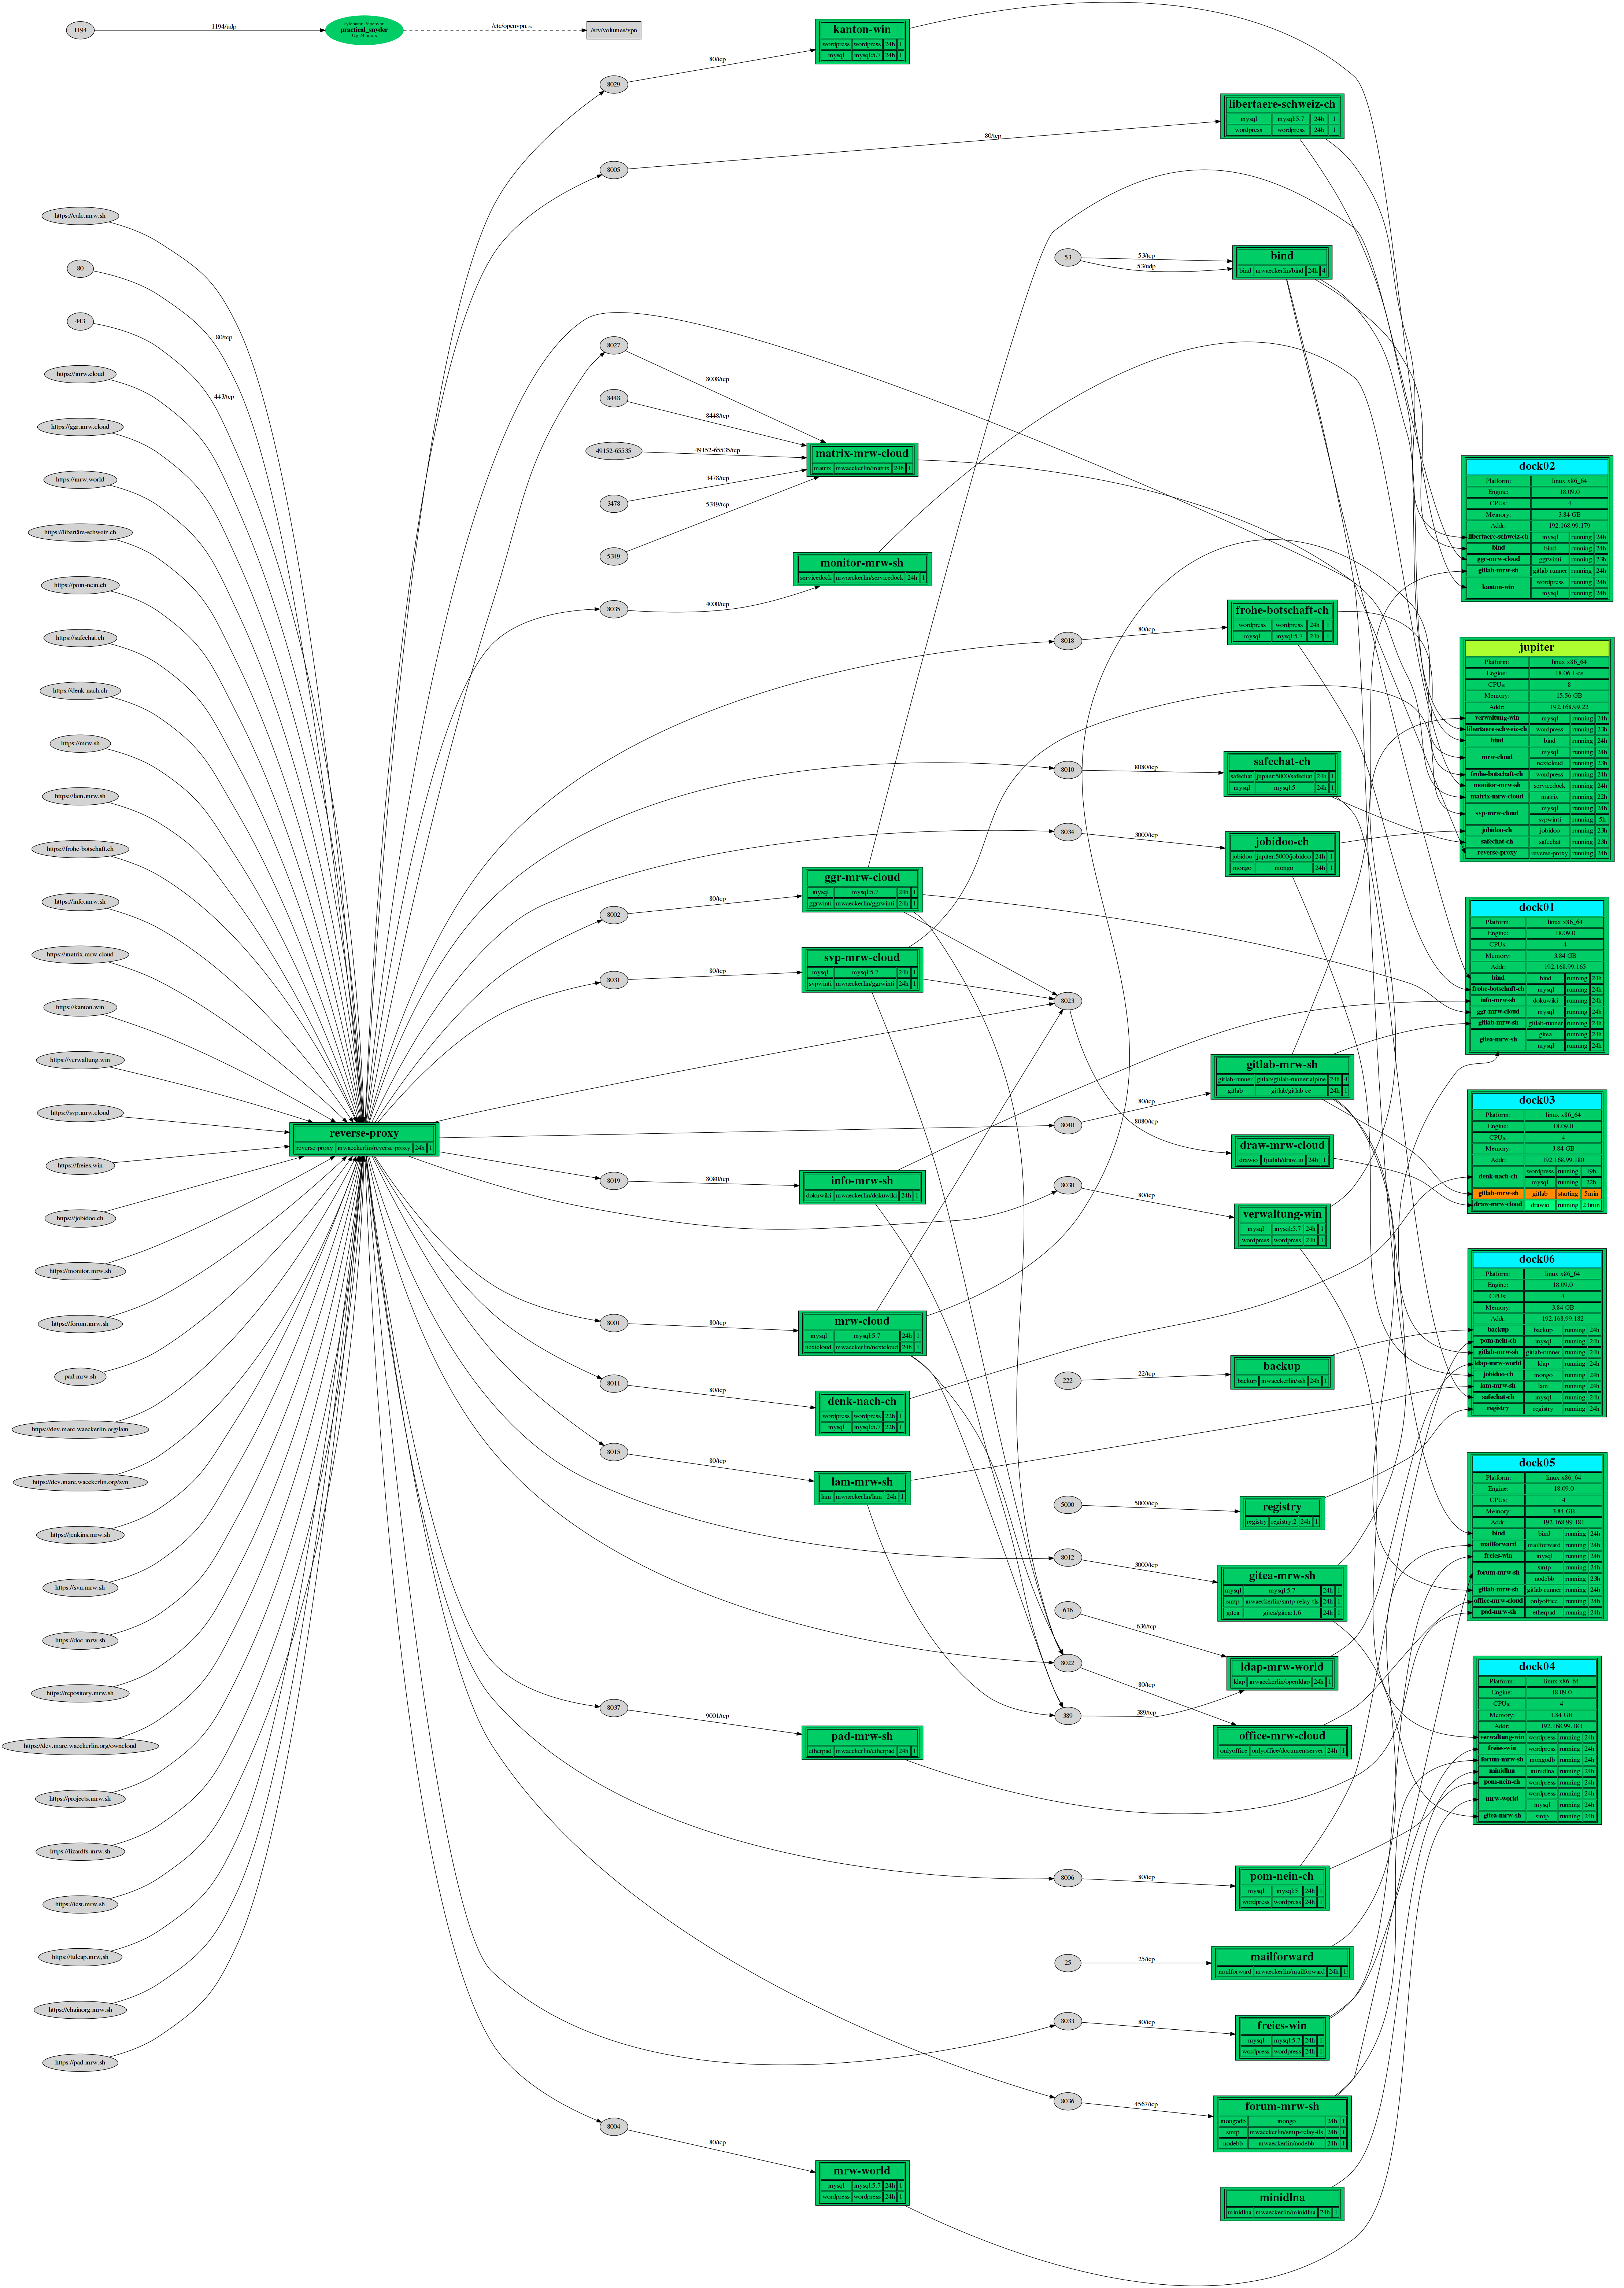
 Docker Swarm
Currently I have a docker swarm running six APU.2D4 as worker and my old laptop as swarm master. In future, the APDU.2D4 will also become master and the router will be configured to forward requests from the internet directly to the active leader. The mass-storage is on 4 HP ProLiant servers that form a LizardFS.
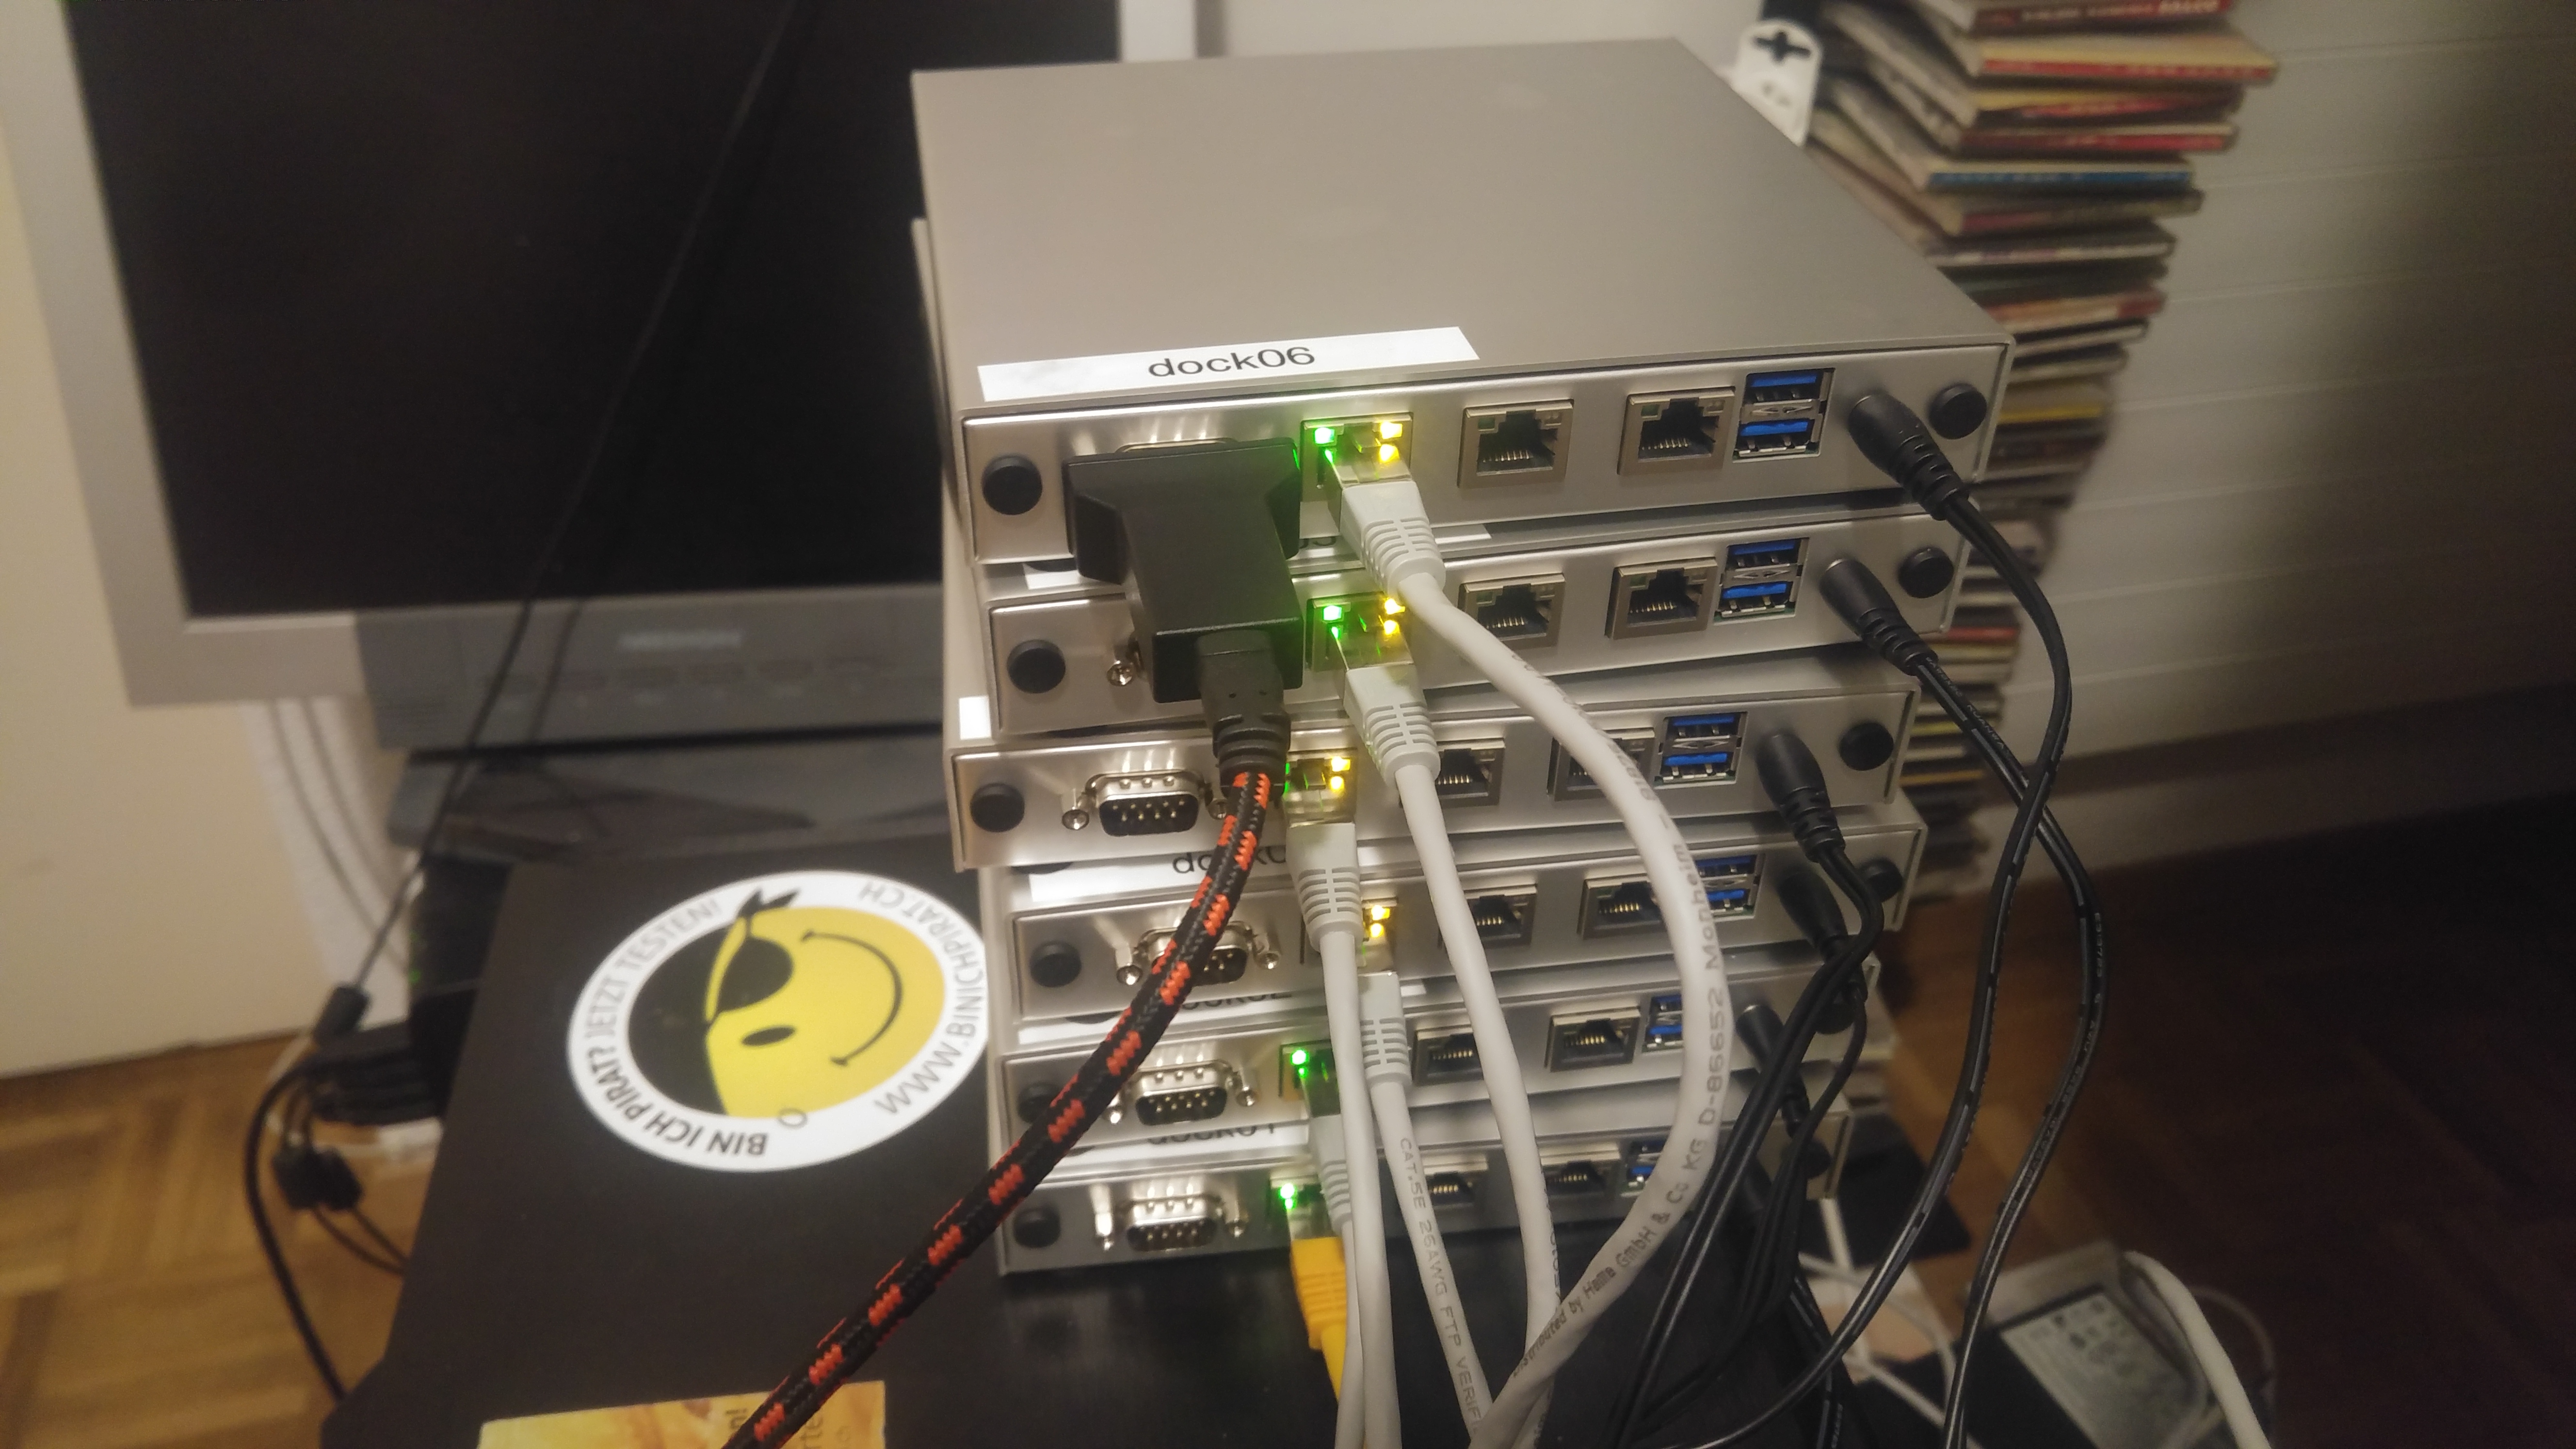
This is my creative chaos:
This is how my swarm looks in ServiceDock: