Synchronize Data between two Servers behind Firewalls
Views: 1193
This article explains, how to synchronize files between two servers behind different firewalls that don’t see each other using rsync with root access on both servers and ssh through a user’s laptop as man in the middle.
Situation
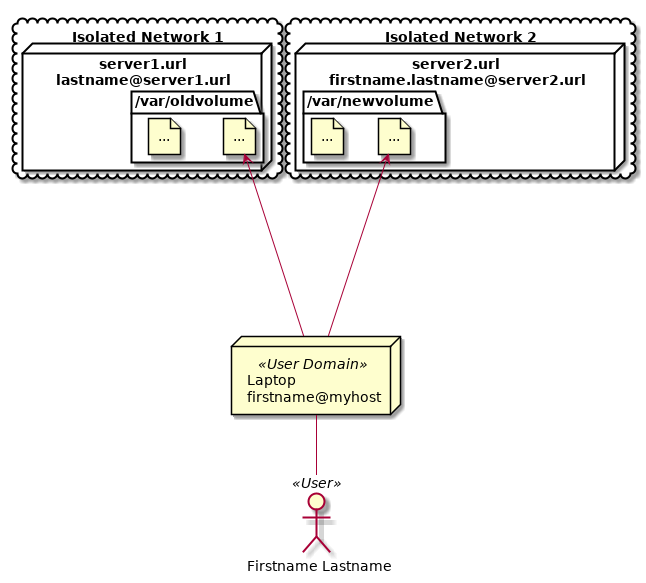
See the following image: The user named Firstname Lastname has an account named lastname on server1 at url server1.url and an account named firstname.lastname on server2 at url server2.url. It is impossible to login from server1 to server2 nor vice versa. In addition, the connection from the user’s laptop named myhost to the servers is unidirectional: The laptop can reach both servers, but the servers cannot reach the laptop. The laptop is behind a NAT and does not have a publicly available IP address. There is no routing from the two isolated networks to the user’s laptop, nor is there a routing between the two isolated networks. Only the connections drawn below exist, and only in the specified direction.

Solution
There are different techniques that can be combined here:
- open a network tunnel using
ssh - use an
sshjump server - allow
sudowithout password - synchronize data using
rsync - optionally use
ssh-copy-idto share keys forsshwithout password
Preparation
On the user’s laptop install and run an ssh daemon, e.g. in Ubuntu:
apt-get install openssh-server
Open a Network Tunnel Using ssh
OpenSSH offers the possibility to open a port to port mapping from local to remote (option -L) or from remote to local (option -R). Here, we need remote to local: User on laptop myhost logs into server1.url and opens a tunnel from server1 at port 8000 to his laptop’s port 22 (port 8000 is arbitrary chosen, port 22 is the standard OpenSSH port):
firstname@myhost:~> ssh -tR 8000:127.0.0.1:22 lastname@nullserver1.url
lastname@nullserver1.url's password: ********
lastname@server1:~>
Now the user is on server1 and server1 has locally (127.0.0.1) port 8000 opened, which is tunneled to port 22 on the user’s laptop myhost:
lastname@server1:~> nmap localhost
Starting Nmap 6.40 ( http://nmap.org ) at 2019-12-16 10:59 UTC
Nmap scan report for localhost (127.0.0.1)
Not shown: 991 closed ports
PORT     STATE SERVICE
8000/tcp open  http-alt
So from the perspective of server1, it is possible to ssh to port 8000 on localhost (127.0.0.1) to get redirected to myhost’s port 22. So from server1 login to myhost:
lastname@server1:~> ssh -p 8000 firstname@127.0.0.1
firstname@127.0.0.1's password: ********
firstname@127.0.0.1:~>
Use an ssh Jump Server
OpenSSH offers the possibility to access a server behind a firewall through a jump server (option -J) in the DMZ, so you just login to the second server through the first:
ssh -J first second
Here that means go from server1 through the tunnel back to the laptop myhost as jump server and from there continue to server2:
lastname@server1:~> ssh -J firstname@127.0.0.1:8000 firstname.lastname@nullserver2.url
firstname@127.0.0.1's password: ********
firstname.lastname@nullserver2.url's password: ********
firstname.lastname@nullserver2.url:~>
Hint: There may be many jump servers, there is no limit to only one, just use option -J multiple times.
Allow sudo Without Password
To execute a command cmd as system administrator root, you call sudo cmd. Hint: to open a root-shell, just type sudo -iH. By default, if you are allowed to use sudo, then you must enter your password. The problem you will have is, that with rsync, you cannot easily enter a password for a remote sudo. That’s why you need password-less sudo on server2. This is done by changing the file /etc/sudoers. Normally, if you are allowed to administrate a server, you are either member of group admin or group sudoers and these group are allowed to run any command with sudo, e.g. for sudoers:
# Members of the admin group may gain root privileges
%sudoers ALL=(ALL) ALL
Now you need to change this so, that sudo is allowed even without password:
# Same thing without a password
%sudo ALL=(ALL) NOPASSWD: ALL
Login to server2 and set it up, using sudoedit.
Synchronize Data Using rsync
The most used tool to synchronize data is rsync. Just type man rsync for more information. Important options here are -e "ssh -J firstname@127.0.0.1:8000" to specify that synchronization is done through ssh and through a jump server, and option --rsync-path "sudo rsync" to specify, that the rsync command on the target server needs to run as sudo with root privileges. That’s necessary to synchronize restricted files. It is not necessary to synchronize files that your remote user is allowed to read. Typical options I almost always use are -avP, which means archive (recursive, keep permissions, links, etc.), verbose and show progress. Also recommendable (but be careful!) is, to add the option --delete to delete files on the target, that have been removed from the source since the last synchronization. Example: Synchronize recursively all in /dir1 on host remote to /dir2 locally (trailing / is important):
rsync -avP remote:/dir1/ /dir2/
Or vice versa, synchronize local /dir2 to remote /dir1:
rsync -avP /dir2/ remote:/dir1/
In this case here, the full rsync command is:
sudo rsync -avPe '"ssh -J firstname@127.0.0.1:8000"' --rsync-path='"sudo rsync"' \
    /var/oldvolume/ firstname.lastname@nullserver2.url:/var/newvolume/
SSH Login without Password
You can preshare a key, so you can login to a remote server without password request (if the key is not encrypted, otherwise you will be asked the password of the key), using:
user@local:~> ssh-copy-id remote
It is much more secure to use a shared key, when the key is encrypted, than to use a password only. With a secret key you must own and a key’s password you must know, you have a two factor authentication.
Putting All Together
You can do it in individual steps, but before assure that sudo on server2 runs without password, then:
firstname@myhost:~> ssh -tR 8000:127.0.0.1:22 lastname@nullserver1.url
lastname@nullserver1.url's password: ********
lastname@server1:~> sudo rsync -avPe "ssh -J firstname@127.0.0.1:8000" --rsync-path="sudo rsync" /var/oldvolume/ firstname.lastname@nullserver2.url:/var/newvolume/
[sudo] password for lastname@server1: ********
firstname@127.0.0.1's password: ********
firstname.lastname@nullserver2.url's password: ********
Or just as one command (note the quotes):
ssh -tR 8000:127.0.0.1:22 lastname@nullserver1.url \
  sudo rsync \
    -avPe '"ssh -J firstname@127.0.0.1:8000"' \
    --rsync-path='"sudo rsync"' \
    /var/oldvolume/ \
    firstname.lastname@nullserver2.url:/var/newvolume/
